
For awhile now I've been drooling over some wall art from Urban Outfitters, but they don't have it available anymore, and it was way out of my budget. Soo...I decided to make my own!
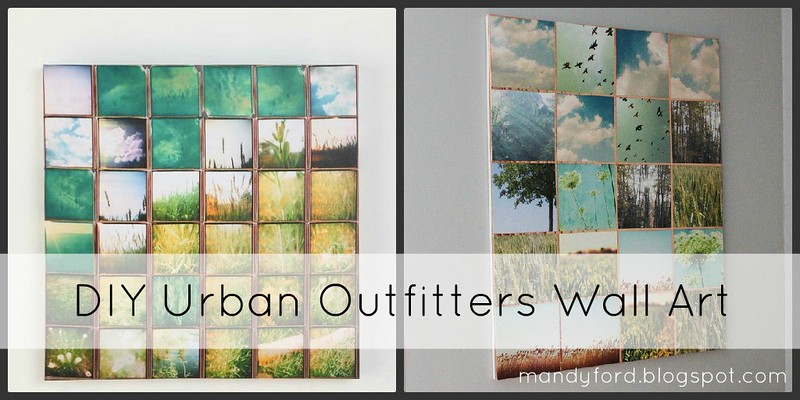
Here are the easy steps and inexpensive items I used to create my knock-off Urban Outfitters art.
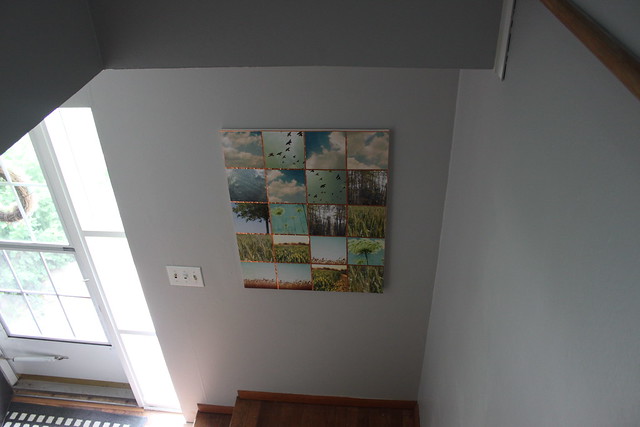
I started with a 24 x 30 inch canvas that was a freebie from my Mom {thanks Mom!} and 20 nature photos that I cut down into 6x6 square. I played around with the layout until I found one I liked...

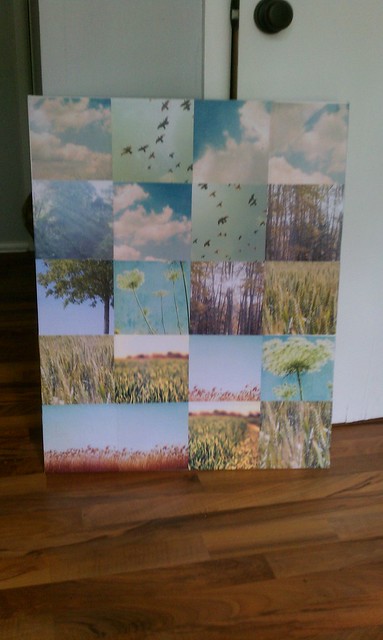
Then I mod podged them onto the canvas...{took this photo at midnight so my apologies for the poor lighting.}

And ended up with this...
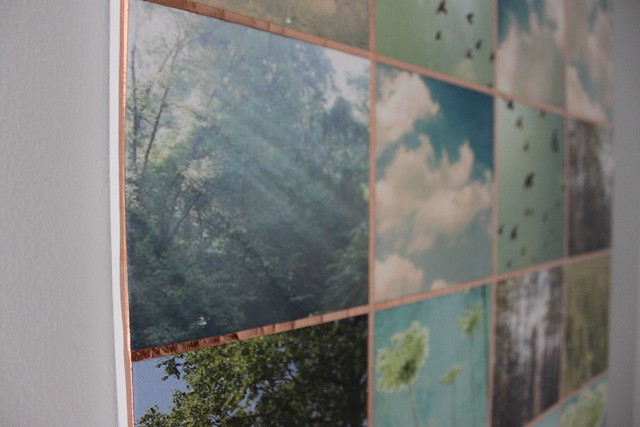
And for the final step I took a roll of this stuff..

Stained glass foiling tape.
It is basically copper tape and such an easy product to work with. Just peel the backing off and stick! And it can be molded around the edges of the canvas for a really great finished look. I outlined all of the edges of the photos with it and put it around the canvas edges. Here is the finished product...

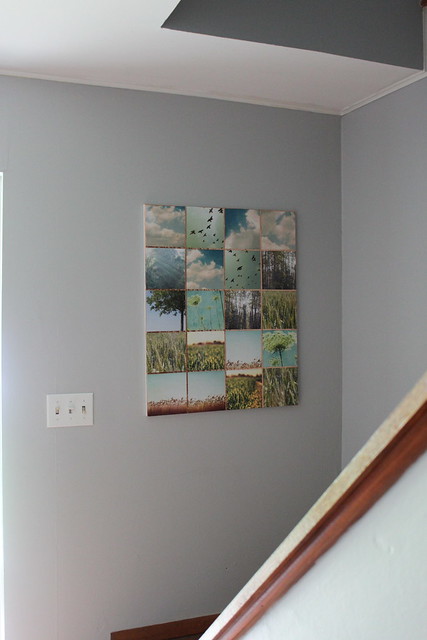
I turned out exactly how I had imagined and is the perfect art piece for our entryway...
And I love that I spent about $5 total for supplies. Here are a few close-up shots...

It is the perfect finishing touch to the new look in our entryway. I love how the colors tie into the vignette on our entryway table...

And it is a happy greeting as we walk down the stairs...
So what do you think? Have you completed any DIY art projects recently? I'd love to see them!
Questions about the products and techniques I used for this project? Check out the FAQ!*
*A kind blog reader pointed out to me that I should give credit for the photos I used, and she is very correct, especially with all of the views this project has received. However, when I did my google searches for photos, it didn't occur to me to save the original sources {lesson learned!}. It was never my intention to copy someone else's work, so if you recognize one of the photos I used as your own, please let me know and I will of course list your credit in this post.
Linking up with...


wow! that turned out amazing! :)
ReplyDeleteI LOVE it!! -Marcia
ReplyDeleteI love this artwork! In fact, I'm definitely going to feature it this Friday. Your photos are beautiful; I like yours better than the original, and what a great tutorial. Thanks so much for sharing (found you on Pinterest.)
ReplyDeleteBrilliant as usual!
ReplyDeleteI love it! You picked great pics to start with too... looks awesome on your wall!
ReplyDeleteBeautiful artwork! Thank you for the great idea!
ReplyDeleteLove it! What a great idea, What a great way to use all those photos I have stored in a box. Thanks for sharing!
ReplyDeleteI think this is great! Good job!
ReplyDeleteI think this is such a cute idea and so easy too!
ReplyDelete- Natalie
what a great collage/piece. you did a fantastic job and i love your colors.
ReplyDeleteSo cute! I love Urban Outfitters, except for the fact that they're so expensive! Thanks so much for sharing this awesome project :)
ReplyDeleteI would love it if you would link up at Watch Out, Martha!’s first link up party: Martha Mondays, going on now through Wednesday! Hope to see you there!
http://www.watchoutmartha.net/2012/05/martha-monday-link-up-party.html
Yours is way better than the original. I love it.
ReplyDeleteBeautiful!
ReplyDelete--Gena at ichoosejoy.org
This is sooooo fabulous!!!! And so much more personal than purchasing the one from Urban Outfitters....
ReplyDeleteYou are my inspiration!!!!
Hey Mandy! Visiting from Not Just a Housewife's linky party...I love this craft idea. The photos on the canvas looked great, but the stained glass foiling tape really finished the piece nicely. Thanks for sharing! :)
ReplyDeleteSo awesome! I am totally going to give this a shot. Hopefully I can find that copper tape. I found you over at Time out Tuesday and now I am your newest follower. Stop by sometime if you would like :)
ReplyDeleteSarah
http://becomingmartha.blogspot.com
Sarah - I found the copper tape at Hobby Lobby in the stained glass section. :)
ReplyDeleteThat looks FABULOUS! I would love for you to share this (and any other creations) at Pin It and Win It Wednesday at www.cheapcraftymama.com-- where you can win free ad-space on my blog!
ReplyDeleteI { L O V E } this! I am making one as soon as I can.
ReplyDeleteDid you stick the tape on the photos after they were on the canvas?
sales@lollylinens.com
That is so cool!!! Amazing. I never would have thought to do that :)
ReplyDeleteThis is rad! I came over from The Shabby Creek linky:) Have you submitted this to Decor Hacks? I bet they'd love it!
ReplyDeleteI really love how that turned out. Might have to try it.
ReplyDeleteawesome i love this idea i might have to copy ;)
ReplyDeleteSo cool this is gonna get pinned agazillion times ty for the how to
ReplyDeleteRaNae
OH MY GOODNESS!!! This is just fantastic!!! I can't wait to try it out.... not sure if I want to take NEW photos... or try and use something I already have on hand. Thank you for the inspiration!!
ReplyDeleteSaw this featured on Watch out Martha, and I love it! The colors and photos you chose are great. Well done!
ReplyDeleteJacinda @ www.yellowcloth.com
Simply fantastic. I'm loving yours more than the original! I'm going to have to find this copper tape. It looks like so much fun!
ReplyDeleteAMAZING idea!
ReplyDeleteYour version is gorgeous!
ReplyDeleteVisiting from Boerman Ramblings! This is just perfect! I love it! Nice work.
ReplyDeleteI love this so much, I featured it at this week's Handmade Tuesday's party. Stop by and check it out!
ReplyDeleteThis is one of the prettiest diy's I have ever seen! It's truely gorgeous! Thanks so much for sharing the instructions. I can't see what size the tape is, could you post up what size to use if you can? I'd love to have a go at making my own version :-)
ReplyDeleteOH my goodness, I love this! So creative and seriously, I like yours better than the original! Gorgeous, I might have to give it a try! Thanks for sharing! I am stopping by from Hookin up with the Hepworths link party
ReplyDeleteThis is amazing. Love the colors of the pictures and how they all work together!!
ReplyDeleteMaggie
www.thehellonheelshousewife.blogspot.com
Love yours better!
ReplyDeleteAmazing and brilliant. Wow!
ReplyDeleteOMG I am in LOVE with this! Once I made an art project out of calendar squares like this on my old apartment's fireplace, then I antiqued it. It came out really cool. I think I just make one of these for my house!
ReplyDeleteGreat job... glad to find you on Pinterest. I'll be doing some Modge Podging of my own soon. Thanks for the inspiration, very very cool!
ReplyDeleteAs an avid photographer, I thank you....for giving me the inspiration to start creating my own collages. Also to me dear friend Kathleen for giving me this link...........Photos capture what we tend to forget....Maureen, Duncan, British Columbia, Canada.....xo
ReplyDeleteWondeful job thanks for sharing I'm definitely going to try this one!
ReplyDeletelove it! This is a beautiful piece, how did you decide on the copper tape instead of something else? Just wondering about your creative process. Gorgeous, darling!
ReplyDeleteI really love this! Very inspiring. I'm really curious to where you got the nature photos. Did you take them yourself or are they from calendar? They're beautiful!
ReplyDeleteSo mod podge just on the back of the photos? No mod podge on the front of the photos? Just checking because this looks like an awesome project.
ReplyDelete@Nat - mod podge on the front too...a nice thick coat. :)
ReplyDelete@April - I wanted it to look like the original, which looked like stained glass, and for some odd reason I remembered that you can buy the stained glass tape at Hobby Lobby. And it just happened to work perfectly! :)
ReplyDelete@KellyH - I found the photos online just by doing google searches for nature images, and I printed them on a color copier, then cropped down to 6x6 squares.
Ah, I see. One more question - were these pictures printed on photo paper? Did you have any issues with ink smearing? Any issues with brushstrokes from mod podge showing? Okay, that was more than one question.
ReplyDelete@Nat - Nope...not photo paper. Just regular matte paper that was a bit thicker than copier paper. I didn't have any trouble with the ink smearing, but in the past when I've used copier paper (thin stuff) I've had trouble with the image wearing off if I get the mod podge on too thick or rub it too hard with the brush. I used a foam brush for this project which helped keep the brush stroke marks at bay. I tried to brush it in every direction as well. Hope this helps! :)
ReplyDeleteThat is such a great art project! I love it!!!
ReplyDeleteLove your project!! Thanks for sharing.
ReplyDeleteThis is great! Love all the photos you chose
ReplyDeleteIt's just beautiful! Did you use glossy or matte modge podge? Would it work with actual photo printed at say, Walgreens?
ReplyDeleteKati
I love this! It looks very professional! Where did you buy the copper tape? Do you think it would look just as good with black and white photos?
ReplyDeleteI looooovvvveee it!!!!!! I'm gonna have to knock-off your fantastic knock-off!!!!! :D
ReplyDeleteI love this! When I go on vacation this summer at the beach I am taking pics just to make one of these! Great idea.
ReplyDeleteWhere did you find the pictures online? What words did you search?
ReplyDeleteYou have inspired me. Thank you!!
ReplyDeleteI love this! I may have to recreate my own version! Thanks for posting!
ReplyDeleteYOur art is fantastic!!!! I like your collage better that UO's any day! I'm not a crafty type (mainly no confidence), but I think I could do this. Did you take your own photos for this? LOVE IT!
ReplyDeleteI loved your version so much better than the one that they sold. Thanks for the great idea!!!
ReplyDeletethis is beautiful. did you modpodge over the picture or just use it under the picture?
ReplyDeleteAt first, I wasn't interested in the tutorial because I incorrectly thought the one you made was no longer available from U.O. and the one from U.O. was the one you made. Obviously, I greatly prefer your version! You did a great job and this is one tutorial I will absolutely give a try! Thanks for sharing!
ReplyDeleteWow that is awesome I like your version better than the original..I think I will have to do this for above my fireplace..thanks Cheers Frances
ReplyDeleteI love this idea..I thought yours was better than the original too. I am going to try this for above my fireplace.. Thanks Cheers Frances
ReplyDeleteKudos to you!! Your wall art looks better than Anthro wall art!
ReplyDeleteMy favorite pics are of the birds..loved how you linked the two bird photos! Awesome job!! :D)
I like yours better than the inspiration piece - easier to focus on your great photos. The concept itself for the college is fabulous.
ReplyDeleteLOVELY!!!! :)
ReplyDeleteDitto on yours is even better! I want to do this too. Want to see my latest chalkboard project?
ReplyDeletehttp://www.blogger.com/blogger.g?blogID=828363161333070689#editor/target=post;postID=8132273296162119743
I would love to try this! Would it be okay to use photos printed on regular photo paper? or would that not work?
ReplyDeleteI have all these pics of doors and door handles from Italy and Greece (fabulous trip) and THIS is the PERFECT way to display them! Yay! Such a great idea! Thanks!!
ReplyDeleteI like yours better! Great job!
ReplyDeletehi i love this idea and i just bought the supplies to do it but i am a rookie at arts and crafts stuff so i have a few questions... did you print the pictures out on just regular printer paper? and did you put the modge podge on the pictures, under, or both? and last how did you blow the pictures up big enough to cut into multiple pieces without turning them blurry?
ReplyDeleteHi Mandy, Stopping by to let you know I featured you Urban Outfitters Wall Art on my blog today! Love it! I have a linky party starting tomorrow and would love it if you would link something up!
ReplyDeleteKim@madeinday
http://madeinaday.com
Wonderful execution of an idea! Question- since you are using mode podge to adhere the photographs, is it also being spread over the top of the prints and if it is do you need to use a special paper?
ReplyDeletesince you are using mod podge do you have to use special paper to print your photos on?
ReplyDeleteHi Mandy! I just wanted to let you know I decided to repost your DIY wall art post on my blog, I linked it to your blog and had so much fun doing it ! Great idea thanks,
ReplyDeleteCassie
What a great project! Hi, my name is Melissa and I'm the managing editor for FaveCrafts.com. I was wondering if you'd be interested in allowing us to publish this project on our site. I have a newsletter of "knock off projects" coming up and I'd love to feature it! You can contact me at mconner@primecp.com for more information. Thanks and I look forward to hearing from you! Best, Melissa :)
ReplyDeleteI fell in love with that same piece at Urban Outfitters--but, like you, found it WAY out of my price range! I would love to make this project though. How much depth did your canvas have? It looked like it was really thin in the pictures.
ReplyDeleteI fell in love with that same piece at Urban Outfitters! But, like you, I found it WAY out of my price range. I would love to make it though. How thick was the canvas you used for this project? In the pictures it looked pretty thin...
ReplyDeleteI hope you don't mind - I have linked to this project on my blog as a project I'd like to attempt. I love your version - I think it's better than the original! My blog post is here: http://myroundtuitblog.wordpress.com/2012/07/12/diy-urban-outfitters-wall-art/
ReplyDeleteAmazing! I want to get started right away. I think I like yours even better than the original! :)
ReplyDeleteThis comment has been removed by the author.
ReplyDeleteThat is just fantastic.I just love it an is is, is like adding beauty to age ..It is such a nice idea and you did it very well..
ReplyDeleteLove love love!!
ReplyDeleteThanks for the inspiration! I plan to do this!!
I like yours better than theirs!
ReplyDeleteI'm doing a smaller version...did you use spray glue to attach the pictures to the canvas? Or does the modge podge adhere them. I've never used that.
ReplyDeleteBeautifully painted. I do like the freedom in this piece.
ReplyDeleteI love this! Pinning now to try for my new apartment. :)
ReplyDeleteI LOVE IT! <3 great and lovely pictures! :D keep up the good work! :)
ReplyDeleteI love this! I must make it soon. Thank you for sharing:)
ReplyDeleteThis is so great! I was trying to figure out a cool way to display some wedding pictures without frames - I think I found it!
ReplyDeleteLOVE THIS! I just ordered a bunch of my instagrams on Printstagr.am and am going to use those 4x4s to do this! Thanks so much!
ReplyDeleteI really love your DIY!! Nice blog!! Maybe you would like to follow each other on facebook and gfc? Let me know dear ♥
ReplyDeleteKisses Demi
Demi's Canvas on Facebook
Demi's Canvas
Yours looks so much better than the one from Urban Outfitters! I can't wait to try your idea!
ReplyDeleteDid you use glossy or matte mod podge? And were the photos printed on hardstock paper or photo paper?
ReplyDeleteChrista - I used matte mod podge but any type would work...just depends on the finish you are going for. I also used matte cardstock, but I've heard of others use photo paper and that also works. Lots of options for this project. :)
ReplyDeleteDid you put the mod podge all over on top of your pics???
ReplyDelete@Angel - Yep! Put a nice thick coat under the photos AND on top. Hope this helps! :)
ReplyDeleteHey Mandy, just came upon your blog through a google search. I love this project and am inspired to do one myself. It looks amazing. I just wanted to let you know to link your project over at East Coast Creative where they are showcasing "knock off" projects that have been done within the year. Here is the link
ReplyDeletehttp://www.eastcoastcreativeblog.com/2013/03/creating-with-stars-round-2-link-party.html#more
Lucy @ www.patinaparadise.blogspot.com
You have done great work, the urban outfitter wall art print's image you have added here, it looking very nice, we can see your creativity by this post, that you have great creativity. Thanks for sharing the easy and great Tutorial.
ReplyDeletehttp://www.canvasdesign.co.uk/
This is really a fun project, i have enjoyed your DIY wall art project, this wall art is looking very nice. Many thanks for sharing.
ReplyDeletehttp://www.aboutus.org/User:Tom_Wiliam
Love love love your piece if art!
ReplyDeleteDid you use mod podge over the copper foil too? Or just the photos?
Many thanks for posting!
Jess
Love it! The photos are beautiful and I love the colors! Thank you for sharing!
ReplyDeleteHave a great weekend!
Amy
www.homesweetthriftyhome.com
Fantastic!!!
ReplyDeleteVery nice! Live the pics and copper tape!
ReplyDeleteThis is such a great idea- and the use of stained glass foil is so clever!
ReplyDeleteBeautiful!
ReplyDelete--I never even heard of "Mod Podge"! LOL!
You take awesome photos, too!
Such an good idea for Photo canvas services.
ReplyDeleteWhat a great and amazing ttalent you had i wish my wife have same talents on you when it comes to decorating our home. Anyway do you have any idea about modern abstract paintings?
ReplyDeleteThank you for the idea. I hadn't seen the Urban Outfitters art, but your tutorial made me think this project would be perfect with the photos I took on vacation last summer. The desert theme went beautifully with the copper tape, and now I'm inspired to do my house in these colors! You can see a photo of my finished canvas here: http://elaineziman.blogspot.com/2014/01/desert-artwork.html
ReplyDeleteLOVE IT! thanks for sharing!!! :) will definitely make one, love nature and photography what a great way to combine them
ReplyDelete