Showing posts with label storage. Show all posts

Monday, July 01, 2013

{goodwill tray makeover}


I made a little trip to Goodwill yesterday and came away with some great finds. One of them was a metal file tray for $3.99.

I knew right away that I wanted to use it on my craft desk. My washi tape collection has grown larger than my previous storage for it can handle, and I also needed a place to store my jewelry making supplies. A can of cream spray paint was all it needed!


I used a few pieces I already had to hold my washi tape, as well as a fun new milkglass piece I picked up when I bought the tray.

The bottom tray is perfect for holding my jewelry making supplies...


And now I don't have an excuse for not buying more washi tape, right? {wink}

Have you transformed any Goodwill finds lately? I'd love to see them!

post signature

Tuesday, June 26, 2012

{orla inspired jewelry box}


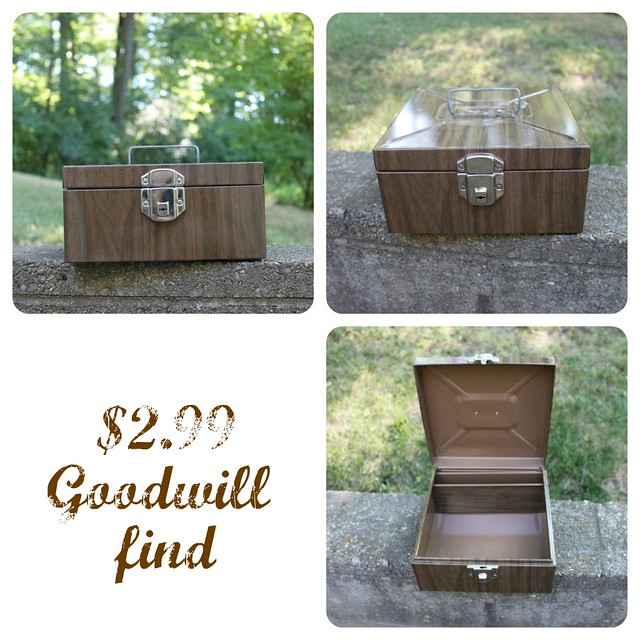
On my most recent thrifting adventure to Goodwill, I scored not only some great clothes, but also a perfect vintage faux bois filed box...


Yep...$2.99 later and it was all mine. I wasn't quite sure what I was going to do with it at first, but I knew it had tons of potential.

After doing a lot of purging and organizing of my wardrobe and accessories, I realized that I needed a better place to store my rings and bracelets, so this cute little box was the perfect solution. After a date with some contact paper, scrapbook paper, and a few other accessories, I came up with this...


So fun, right?

I love Orla Kiely, especially this iconic pattern of hers...


And when I noticed a roll of white contact paper sitting in our laundry room, I had a bit of a lightbulb crafting moment. I cut out some stems and leaves...


And adhered them to the front of the box...


Super simple...and since contact paper is removable I was able to move them around until I had the arrangement I liked.

Then I added some happiness to the inside, starting with a favorite piece of scrapbook paper {what's better than clouds and dandelions?!}


And to add an extra splash of color and inspiration,  I grabbed a couple magnet clips and attached a sweet card from a blog friend inside the lid...


I love how the colors in the card and the scrapbook paper bring so much life to this little box...


Then I added my jewelry! I tucked in a vintage dish for my rings, and used the divider to hang some of my bracelets...


I hated to cover up all of that pretty paper but I have quite a few bracelets in there now. It is the perfect storage solution for all of these small accessories.


What do you think? Have you transformed a thrifted find into a great storage/organization piece? I'd love to hear about it!

Linking up with...

southern hospitality

post signature


Tuesday, February 07, 2012

{IKEA storage solution}

It is no secret {or maybe it is to you} that my husband and I aren't the best organizers on the block. Or perhaps the planet.

For lack of a better word, we suck at it.

And once the boys were added to the house...well... it was game over on keeping up with the many areas of life that require organizing.

But this year I am finally making a commitment to organizing our house...as daunting as that task seems. So I started out small with the help of some great little containers from IKEA. I love these things! For $8 you get six nylon collapsible {they zip!} containers that work for just about any small storage you can think of.

My first purpose in mind when I bought these was to corral all of our medication which had taken over a few shelves in one of our kitchen cabinets. I should have taken a before pic because it was baaaad. But here is the lovely after...


One of the larger ones is for the boys, and the other two are for the assortment of medications the hubby and I use.

Then I needed to figure out what to do with the other three. My next stop was the bathroom, where my hair ties and other random hair paraphernalia had taken over every corner of our two drawers. {again...no before pic because it was scary}...


Ahhh....much better!

And while I was in the bathroom, I took one of the two biggest containers and threw all of the boys' bath toys in that sucker. Perfection. And since it is nylon it is the perfect material for those wet watering cans and Thomas the Train squirters...


And finally I had one more large bin left. Hmmm....what do to....


It became a new home for the boys' favorite books that we keep in the family room. It is the perfect size to fit on the shelf of our vintage typewriter table, and so far the boys have been good about putting them back {when encouraged of course}.

So there you have it...four different storage solutions for $8. Not too shabby, huh?

post signature

Saturday, January 21, 2012

{DIY Earring Stand}

For the past few months, I've been on the hunt for a stand/organizer for my stud earrings. Last year I shared my DIY jewelry organizer that holds my hanging earrings, as well as my rings and favorite necklaces. But that project didn't solve the storage solution for my stud earrings that I wear fairly often.

Then I came across this idea on Pinterest...


And a crafty lightbulb went off!

The last time we went to IKEA, I purchased this $1 picture frame...


because it was 1. cute and 2. only $1. But since then I hadn't found a spot for it.

Until that little crafty lightbulb went off in my head. So I gathered my supplies which included the frame, my cropodile, and a pen...

This is where I have to apologize for the low quality pics...all I had on hand when this crafty genius moment hit me was my cell phone. :)

The frame came with two pieces of plastic inside, both of which were covered in a thin plastic film. The film made it very easy to mark off the plastic without leaving permanent marks. While the plastic was still in the frame, I traced around the inside of the frame onto the plastic. I then marked off one inch increments onto one side...


I then drew lines across...


And then used my cropodile to punch my holes {I eyeballed them because I'm lazy like that...I know they aren't totally even and I'm OK with that}


The only bummer is that my cropodile wouldn't reach into the center of the frame, but if I want to later on, I could use a small drill bit to make more holes.

And then for the fun part! I put the plastic back into the frame, added my earrings, and voila!


I can't tell you how much I am in love with this little piece of earring holding goodness. And I even have one more set of holes for some yet to be purchased earrings...


So with some Pinterest inspiration, $1 frame, and about 10 minutes, I created the perfect and simple solution to store my earrings. 

Low cost + big impact = my kind of DIY project. :)


Linking up with...

DIY Club

The Southern Institute


Confessions of a Stay At Home Mommy
IHeart Organizing


post signature

Friday, January 20, 2012

{mail storage solutions}

We are in desperate need of a storage solution for our mail and paperwork at our house. Please tell me we aren't the only ones that have this problem. Mail on the kitchen counter...the island...the desk...in my purse. It is out.of.control.

One of the problems with our house is that it is a split level, so you come in on the bottom floor but the bulk of our living space is upstairs. So I'm not sure where to keep our mail. Now that our office area is going to be in the rec room on the first level I think it will make more sense to hang something in the entryway, so it is convenient to drop things off when I come home, but I would also have our bills and paperwork close by to remember to file and pay things when needed.

Here are a few ideas I've pinned to cure our mail conundrum. This first is my favorite but I can't seem to find where to buy it...

Source: bhg.com via Mandy on Pinterest


Source: amazon.com via Mandy on Pinterest


How do you organize your mail and paperwork? I would loooove some help here!

post signature

LinkWithin

Related Posts Plugin for WordPress, Blogger...