Showing posts with label DIY. Show all posts

Monday, September 05, 2016

{felt leaf garland}


I'm in full on fall decorating mode around here. 

Pumpkins on every possible surface. That's a post for another day though.

Today I want to share a super easy DIY project with you. So easy that I debated even sharing it, but it turned out so lovely I figured why not!


Saturday I broke out my felt, yarn and hot glue gun to whip up a happy little fall leaf garland. 

I took a trip to Joann Fabric to pick out the felt - four coordinating colors that felt like fall to me and also matched my other decor. I free handed the leaves (used a sharpie to draw out the more complicated shapes), but if you need a bit of help with shapes a Pinterest search is super helpful. I even found a template here.

My first attempt at stringing them together was with a needle and clear thread, but it was a total fail. I wanted them to lay facing out when hanging, and that wasn't happening with the string. So I broke out my trusty old glue gun and some yarn. 


And it turned out perfectly! I might make another to hang over our kitchen window.


The fun thing about this project is you can cut out any darn shape you want! Feathers, acorns, pumpkins...and felt is super forgiving. 


Hope this inspires you to create some of your own fall decor!

XO,

signature

Thursday, January 07, 2016

{Goodwill > Target}


If you know me at all, you are aware of the fact that I'm a bit obsessed with Target and midcentury design.

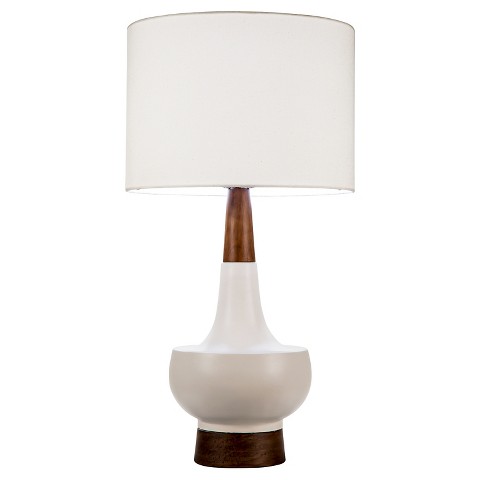
So when I saw this lamp on our last Target trip I fell in love.


But not with the $65.99 price tag. I refuse to pay that for a Target lamp, or a Target anything for that matter. Target is for clearance deals, the dollar spot, and cheap popcorn.

So the lamp stayed on the shelf.

Fast forward a week, perusing the aisles at my local Goodwill, I spotted this!


Sure it was more than a bit dingy and the shade wasn't the right scale, but otherwise it was perfection. 

And $6.99. 

So I brought it home, spiffed it up with a fresh coat of white paint, added a shade I already had hanging out in our laundry room, and voila!


I wish the details are more visible in this photo, but you can see them in the before. I'm in love with the texture and pattern on the base, and that wood makes me drool. So good. 

Is there anything better than a fantastic thrifted find? I think not.

Have you scored any awesome thrifted deals lately? Show me! Oh, and if you want more tips on Goodwill shopping, check out my 5 Rules for Scoring Big at Goodwill!

XO,
signature

Monday, February 23, 2015

{quick diy project}


On my last trip to Goodwill, I was lucky to find this great stair basket...


I've wanted one to corral all of our hats and gloves. But I wasn't too excited about the boring paint finish.

Simple enough to fix though, with a can of pretty olive green spray paint and some painter's tape!

I wanted to keep the wooden balls the original color, so I taped them off and then went to town with the paint. And I'm super happy with the results!


Not bad for a $4 basket and a $3 can of spray paint!

I would show it to you on our stairs, but they are currently a mess of dried up salt and random shoes from this nasty weather we're having. So we'll just leave that to your imagination, OK? 

Have you done any quick DIY projects lately? 

XO,
signature

Wednesday, December 17, 2014

{holiday crafting with Artterro}


We LOVE to craft at our house. Big surprise, huh? 

The boys might actually love it more than me, especially Landon. Every day when he gets home he pulls out his paper, crayons and random bits of stuff to make a book or an airplane or some other gadget. 

So when Artterro offered to send us a Christmas ornament kit, we were so excited. Landon actually carried the kit around the house at random times for a few weeks until I was ready for us to make the ornaments. Poor kid. :)

But it was worth the wait because they had lots of fun and their ornaments turned out great!


This was the first time the boys had done decoupage, and they did really well with it! They had to get over the fact that their fingers were going to get messy {I know...boys should love that stuff right?} but otherwise they really enjoyed the process and how the paper became molded to the shapes of the ornaments. The kit came with a fun variety of tissue paper and trims, and different ornament shapes. 


Ben went straight for the heart shape...


And Landon chose the star...


I only have a few photos of the boys making their ornaments because my fingers were covered in mod podge! Definitely a project where you need a separate photo taker. 

Here are our finished ornaments. I love how the boys mixed the papers and trims. They are beautiful!


We even have a few ornaments leftover to make later. This kit is a great craft to do at the holidays to make ornaments for your own tree, or to give away as gifts. 

*The supplies for this craft were provided by Artterro but all opinions, and sticky fingers, are 100% mine. 

XO,
signature

Thursday, May 29, 2014

{six birthdays}


The boys are turning 6 tomorrow {!!!}, so I thought it would be fun to share a recap of their first five birthdays. 

I've had so much fun each year with the themes, and you'll see that for #3 and #4 I reallllly got into it. Although I've still enjoyed planning their parties the past two years, I've toned down the amount of work I put into it to save my sanity. 

This year is a camping theme complete with a big teepee, nature scavenger hunt and s'more cupcakes. We're having the party at the park for the first time which the boys are really excited about. I'm excited because I don't have to worry about the house being clean. ;)

Here are their first through fifth birthdays, with links to each post, {or photos for #5 because I was lame last year and forgot to blog about their party}...

First - Circus
Second - Rock Star 
Third - Despicable Three
Fourth - Super Heroes
Fifth - Dinosaurs

Let's see if I can remember to blog about #6!

XO,
post signature

Sunday, May 04, 2014

{boys' bedroom makeover}


Oooh I'm so super excited to finally be sharing the boys' bedroom makeover with you today!

It has been quite a process and the first really DONE room in the house which makes me so happy. Even if the rest of the house is a complete disaster, I can sneak away to their room and act like my entire house is this cute and clutter free. 

So here are the photos and I'll have a source list at the end!
I thrifted this cute cubby shelf from Goodwill and painted it red, then let the boys fill it up with all sorts of treasures. The photos are taken with my Instax camera and hung with fun washi tape.
This wall is my absolute favorite. I folded laundry in there today just to give myself a pretty view. 
Aren't the arrow decals so much fun? 
The hoop art is one of my favorites of the boys' old t-shirts and some felt...super easy!
My Mom thrifted the light-up globe AND the tin #2 for me. She is the best.
The instagram canvases were a fun DIY project.
Another DIY project was this palette art...
And this post wouldn't be complete without my goofy Benny striking a pose...
They love their new room and that made the work all worth it.
Source list:

  • Bed, bedding, toy box & hamper: IKEA
  • Dresser, globe, #2, cubby shelf: Thrifted
  • Map print & red ampersand (painted red): Hobby Lobby
  • Arrow wall decals: Groopdealz
  • Bunting: Lilly James Co.
  • Mason Jar sign: Prim and Proper 
  • Photo canvas: Printicular Canvas App via Walgreens
  • Red trunk: TJMaxx
  • Rocker: Passed down from my Dad
  • Rug: Walmart
  • Side table & closet curtain: Target
  • Curtains: DIY thanks to my mother-in-law
  • Palette art and Instagram canvases: DIY
  • Red lamp: Walmart
  • Silver lamp: I can't remember!
  • Red tool box: my Grandpa's

Thanks for taking this little tour with me!

XO,
post signature

LinkWithin

Related Posts Plugin for WordPress, Blogger...